Students
Please complete each step below to ensure a great AWS Training Experience at least two (2) business days prior to the start date of the class.
Detailed Instructions
Click on the dropdowns below for a more detailed view of each step.
Click on the down arrow () for additional instruction.
Step 1. Register for your class
-
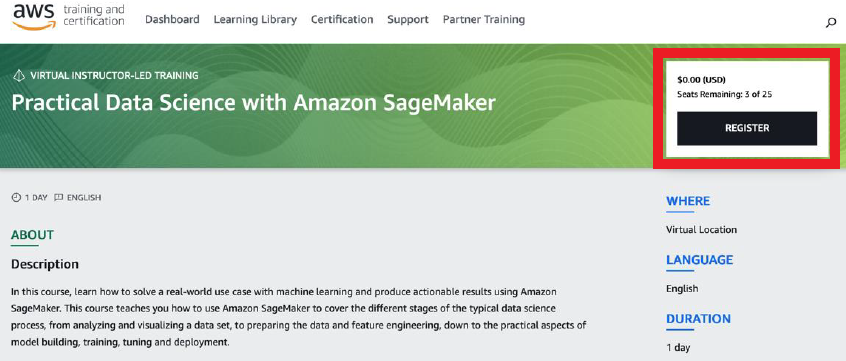
Select the registration link for your class. There will be 2 links provided, select the link that is associated with your Training Account type (Customer AWS Training Account or APN AWS Training Account).
- Customer AWS Training Account Registration Link: Select "Create or Sign In" next to AWS Builder ID.
- APN AWS Training Account Registration Link: Select “Sign in with a different option”. Select “AWS Partner”.
-
Sign in or create a training account to register for class
-
If you already have a training account, follow steps below to sign in
First time signing in with AWS Builder ID:
- Select Create or Sign In next to AWS Builder ID
- Enter your email address, select next
- Enter your name, select next
- A verification code will be sent to your email. Enter the verification code and select verify
- Create a password, select Create AWS Builder ID
- You will be prompted to confirm you have an existing account associated with your email address, select validate with Login with Amazon
- Enter your email address and password, select sign in
If you have previously signed in via AWS Builder ID:
- Select Create or Sign In next to AWS Builder ID
- Enter your email address, select next
- Enter your password, select sign in
-
Create a new training account, more details
If you are not a part of the AWS Partner Network, create a regular AWS Training Account:
- Select Create or Sign In next to AWS Builder ID
- Enter your email address, select next
- Enter your name, select next
- A verification code will be sent to your email. Enter the verification code and select verify
- Create a password, select Create AWS Builder ID
If you are a part of the AWS Partner Network:
- Select Sign In next to AWS Partner Network
- Select Join AWS Partner Network
- You will be prompted to finish setting up your profile. Typically you create an account using your work email address.
-
-
You'll be returned to the main class page. Select Register.
-
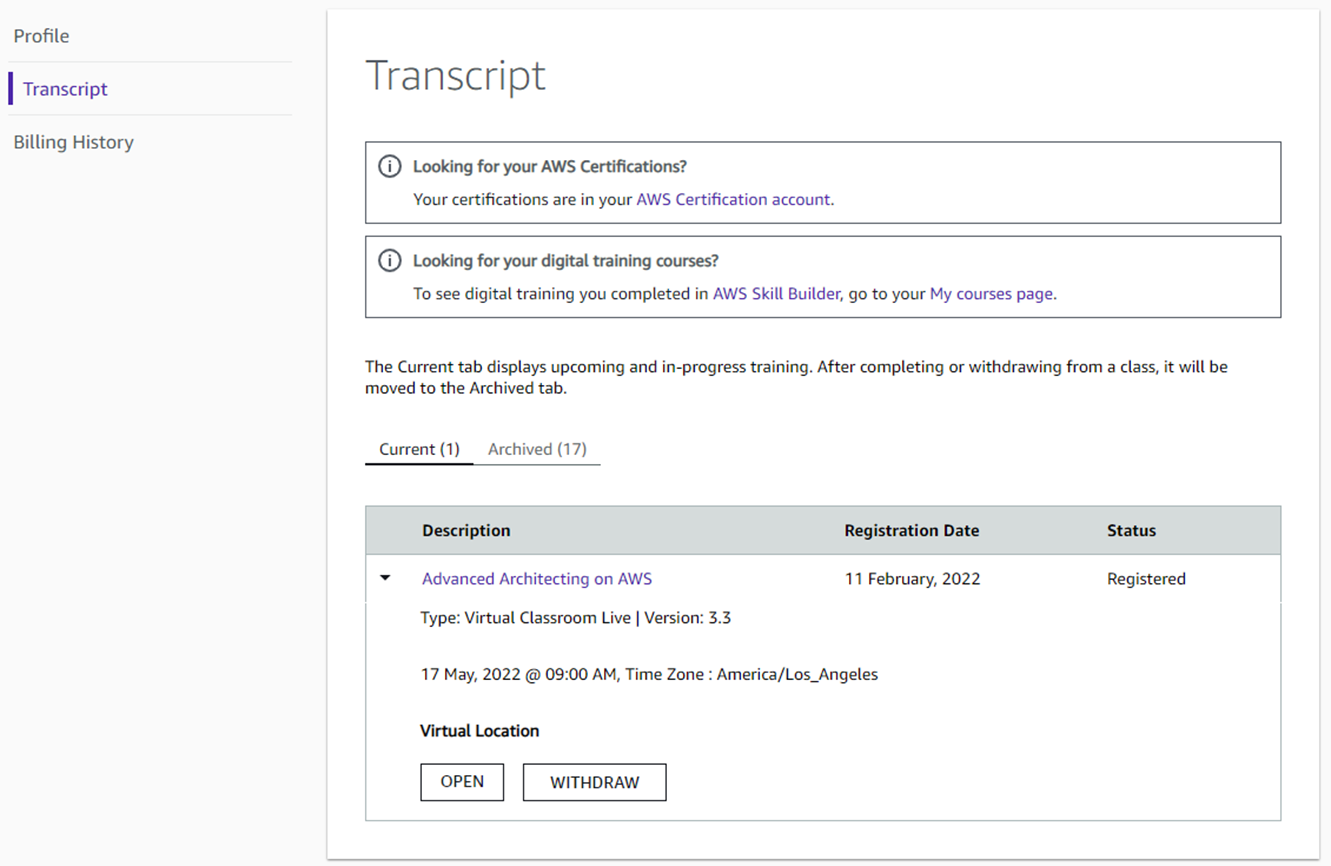
To see your registration confirmation, go to your account's My Transcript page. You'll also receive a registration confirmation email from 'no-reply@aws.training'. If you can’t find the email, check your spam or junk mail folder.
Note, you'll return to the My Transcript page on the day of class to join your virtual training.

Step 2. Create a Gilmore eVantage account
If your course is listed below, you can skip to step 3.
- AWS Cloud Practitioner Essentials Day
- AWS Business Essentials Day
- AWS Technical Essentials Day
- Exam Readiness Workshops
- AWS Jam
-
If your course is not listed above, create a Gilmore eVantage account to access your class's digital e-books. Use the same email address you registered to class with.
-
E-books will be distributed by your instructor on the first day of training.
-
If your class has labs, you can navigate to the Classroom Student Landing Page to access both your e-books and labs on the day of training. If prompted, sign in with the same email address and password used to register for class.
Step 3. (Virtual Only) Check your System Requirements for Webex
- You need a laptop or desktop computer with wired or wireless internet access. If you use Mac, please disconnect from VPN, if possible, to reduce lag.
- Check that your computer/internet connection meets the Webex system requirements.
-
Run a test session to get familiar with the environment and controls.
- If you don't already have the Webex desktop app installed, you'll be prompted to click the installer file.
On Windows, click Webex.exe. On Mac, click Webex.pkg. - Download the Webex desktop app for best results. If you are unable to download, you may use Chrome or Firefox to launch the training via web browser.
- If you don't already have the Webex desktop app installed, you'll be prompted to click the installer file.
- Start a Cisco Webex Network Test to validate whether your current settings are optimal to run Webex services, specifically for the speed of the network using TCP and UDP, and port connectivity.
-
To successfully complete the hands-on labs, your device should be able to:
- Use Chrome or Firefox browser (Internet Explorer is not supported)
- Connect to a Windows Remote Desktop using any standard RDP client
- Edit commands using a text editor. A professional text editor (e.g.: NotePad++, Sublime Text, Atom) is highly recommended
- You may wish to use a secondary device such as a tablet to review documentation while you work on your main device
Step 4. Join Your Class!
Virtual Classes
- Sign in to your AWS Training account
- Navigate to aws.training, select Sign In in the top right.
- Navigate to your Transcript by selecting My Account in the top right and then select Transcript
- Locate your class under the Current list, select the > symbol to expand the course details
-
Under Virtual Location, select Open
Note, the Open link will only be available 15 minutes before the start of class. If the Open link is not granting you access, please right-click, copy the link, and paste it into a new tab or window. Be sure to have pop-up blockers disabled.


Important notes:
Please do not share the classroom link with others.
After completing these steps, the session should open in either the Webex desktop app or website. A unique launch URL is generated for each registered participant and cannot be shared.
Note, some companies do not use Webex for their trainings, if your Training Administrator has provided a different virtual training platform, check with them for day of class join links.
In-Person Classes
- Check the venue information in your transcript, Registration Confirmation email, or you can check this with your AWS training point of contact or company Alliance Lead.
- If your class is held in an AWS Office, ensure you bring an ID that matches the name you used when registering.
- Bring a working laptop to access AWS Builder Labs and digital e-books.
- Administrator access to the computer (if running Windows, you can download a desktop app but it is not required to view the virtual class).
- Web Browser: Be sure to use Chrome or Firefox.
- Audio: Please be sure your speakers are on and microphone is muted. A headset is recommended.
- Network: You must have hard wired network or reliable Wi-Fi.
- Be sure to close unnecessary browsers and connections (VPN, Skype, etc) that might make your connection to the training lag.
Contact
Please read our FAQs here for the most frequently asked questions.
If you cannot find the answer you were looking for please email us at aws-training-coord-amer@amazon.com and we would be happy to help you.
Please read our FAQs here for the most frequently asked questions.
If you cannot find the answer you were looking for please email us at aws-latam-tc-operations@amazon.com and we would be happy to help you.
Please read our FAQs here for the most frequently asked questions.
If you cannot find the answer you were looking for please email us at aws-emea-training-ops@amazon.com and we would be happy to help you. Or please reply back to the email you received from AWS Training Operations Specialist and we would be happy to help you.
Please read our FAQs here for the most frequently asked questions.
If you cannot find the answer you were looking for please reply back to the email you received from AWS Training Operations Specialist and we would be happy to help you.
Please read our FAQs here for the most frequently asked questions.
If you cannot find the answer you were looking for please email us at anz-trainingops@amazon.com and we would be happy to help you.
Please read our FAQs here for the most frequently asked questions.
If you cannot find the answer you were looking for please email us at aws-india-training-tc@amazon.com and we would be happy to help you.
Please read our FAQs here for the most frequently asked questions.
If you cannot find the answer you were looking for please submit a form at https://support.aws.amazon.com/#/contacts/aws-training .
If you have a question about Webex system by the day before class create a case at https://mycase.cloudapps.cisco.com/attendeeCaseCreate.
If you cannot access Webex on the day of class please email us at aws-jp-training-vilt-webex@amazon.com and we would be happy to help you.
Please read our FAQs here for the most frequently asked questions.
If you cannot find the answer you were looking for please email us at aws-kr-training-support@amazon.com and we would be happy to help you.
Please read our FAQs here for the most frequently asked questions.
If you cannot find the answer you were looking for please email us at aws-education-cn@amazon.com and we would be happy to help you.